Adding the Read and Understood App to a SharePoint or Microsoft Teams Site
The instructions below will guide you through the installation process of Read and Understood, alternatively, you can watch the video which will take you through the complete process of Installing, Configuring and Sending your first acknowledgements.
Add the App to a SharePoint Site
The following steps have to be completed by a person with Full Control site access to the SharePoint site they will be adding the App to.
-
Login to the SharePoint site where you wish to install the Read and Understood App.
-
Click the Cog (top right) and click Add App.

-
From the Menu, click 'From SharePoint Store'

-
Using the Search box, search WA200007564

-
The message No results found for "WA200007564". This is expected.Click the link 'Find more apps in the SharePoint Store.'

-
Repeat the search in the SharePoint store

-
This will display 1 result, Click the App displayed.

-
Click the Add to Apps site button, having read the details provided on the page.

-
Click the Add to Apps site button, having read the details provided on the page.

Important: We strongly recommend you do not select the option 'Only enable this app'.
Grant App Permission
-
The link below will enable a Tenant Administrator to Grant the Read and Understood App the necessary Permissions:
https://login.microsoftonline.com/common/adminconsent?client_id=da76a27f-abbb-412d-9cf3-052334cdae5b.
Authenticate to your Tenant using your Tenant Admin permissions.
-
Click the Grant admin consent for MSFT button
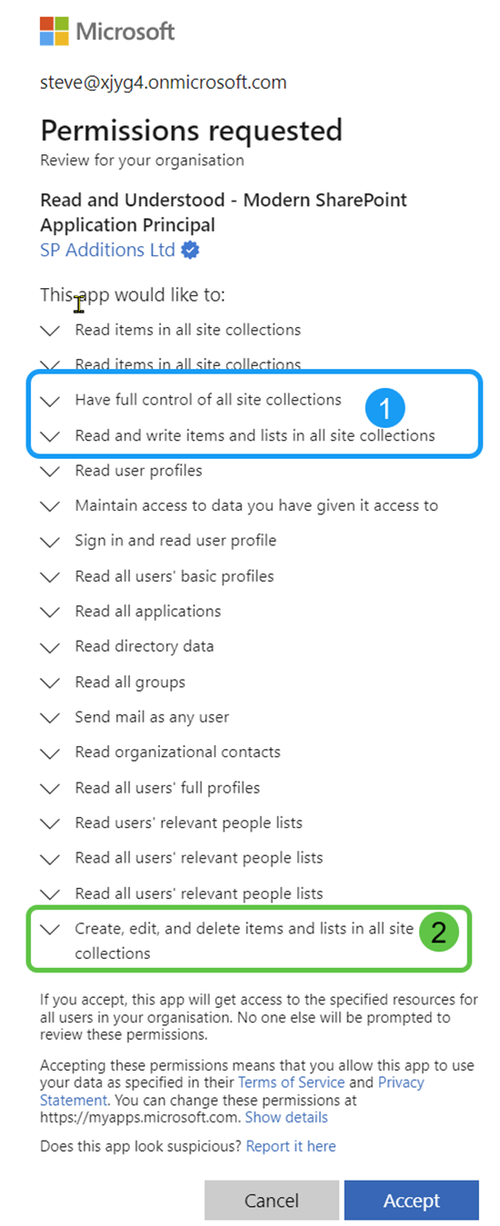
Result: a Permissions requested pop up is displayed.

Read and Understood mainly requires read access to monitor documents in the document libraries it is configured to work with and to allow the selection and processing of users, security and 365 groups.
Two of the permissions requested are read/write/deleted requests and can be removed after the permission request is accepted. Removing the permissions will result in the following loss of functionality:
-
‘Sites.Full.Control’ Removing this permission disables the following features:
- Addressing email using SharePoint group membership
- Creation of organisation sharing links to Microsoft Office documents (Word,Excel...) with referential integrity - should files get renamed or moved.
-
‘Sites.Manage.All’ Removing this permission disables the following features:
- Minor version detection
- Creation of well-named 'Person and Group' SharePoint columns for recipient addressing
-
-
Select Consent on behalf of your organisation and click Accept
Result: The Read and Understood Web site page will appear. Close the window.
Add the Read and Understood App to a Site Page
-
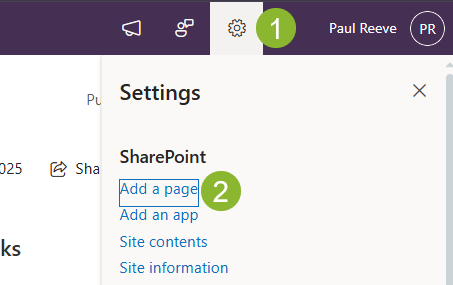
Navigate to the Home page of the site and Click the Cog (1) and Add a Page (2)

Note: Do not do this in the pages or site assets libraries directly as you will not see Apps in the result below. In addition, Microsoft made a recent change July 2025 where the Home Page > New > Page option provides new Templates, none of which offer the option to add an App.
Result: Page Templates, click Apps.

-
A list of Site apps will appear, click Read and Understood

-
Click Create page
A panel will appear in on the Right side of the page for you to provide the ‘App page details’. The Title provided will be Name of the page in the Site Pages Library. We recommend ‘Read and Understood Application’. If you may choose to uncheck the option ‘Show in site navigation’ until permissions are applied to the App.
Save the Page.
Finally
If you unchecked the option to Show in site navigation, to access the page at any time in the SharePoint site click the cog (top right corner of the screen) > ‘Site contents’
Locate the Site pages library and click it to display the content. Locate the page you previously created.
Removal of the old Read and Understood Add-in App
If you already have the Read and Understood Add-In installed, you must complete this step as part of an upgrade.
The steps below should be completed in each site containing document libraries to be used with Read and Understood.
Important: If upgrading from the older Add-in App, a version of the old app is in the SharePoint site under Site Contents.
Site Content Page showing the Old Add-in Version of the App
Before you can remove the App switch to the ‘Classic SharePoint’ experience (see image below). A link is provided in the bottom left corner of the browser page. Once the app is removed, you can click the link in the same place to revert to the modern UI.
You can now remove the App by clicking the elipsys (…) when hovering over the Read and Understood App, click Remove.
Click the elipsys and from the popup click Remove.
Revoking Some App Permissions
-
Login into Entra and from the menu click 'Applications' then 'Enterprise applications'. Listed will be 'Read and Understood...'

-
Click ‘Read and Understood - Modern SharePoint Application Principal’
Result: the Application Overview is displayed

-
In the left navigation area under Security click Permissions:
Result: The Permissions for the application are displayed.

The Delegated permissions were approved when the SharePoint API permissions were approved.
Read and Understood requires additional Application-level permission to function. These permissions are approved by clicking the Grant admin consent for MSFT button
-
Click the Grant admin consent for MSFT button
Result: a Permissions requested pop up is displayed.

Read and Understood mainly requires read access to monitor documents in the document libraries it is configured to work with and to allow the selection and processing of users, security and 365 groups.
Two of the permissions requested are read/write/deleted requests and can be removed after the permission request is accepted. Removing the permissions will result in the following loss of functionality:
-
‘Sites.Full.Control’ Removing this permission disables the following features:
- Addressing email using SharePoint group membership
- Creation of organisation sharing links to Microsoft Office documents (Word,Excel...) with referential integrity - should files get renamed or moved.
-
‘Sites.Manage.All’ Removing this permission disables the following features:
- Minor version detection
- Creation of well-named 'Person and Group' SharePoint columns for recipient addressing
-
-
Click Accept
Result: You will see a conformation message.

-
Wait a few seconds and click Refresh to confirm the permissions have been granted.

To revoke ‘Sites.FullContol.All’
Click the ellipsis (…) and select Revoke Permission

To revoke ‘Sites.Manage.All’
Click the ellipsis (…) and select Revoke Permission


